You’ve installed Scrutinizer only to find out that your network hardware doesn’t support NetFlow or sFlow; what now? If you’re in this situation then you’ve come to the right place. I’ve put together a guide on how to configure a Windows nProbe to send NetFlow v5 to your favorite NetFlow collector and analyzer.
Server Setup
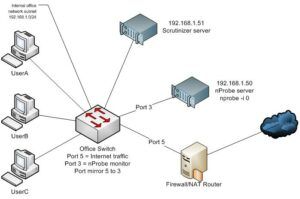
The first step is to strategically place your Windows nProbe server on your network where it can capture all of your traffic. One way this can be accomplished is by placing your nProbe server on your core router or switch that passes all traffic out to the internet then, mirror the traffic on the internet port to send to your nProbe server as shown in the diagram below.
After you’ve gotten your Windows nProbe server physically setup on your network you will need to install the latest version of the Windows nProbe software.
Configuring nProbe
At this point the Windows nProbe server is ready to be configured to send NetFlow. When Windows nProbe is installed on the server it creates a nProbe service that’s configured with default settings. You will need to remove this service and create one that meets your needs. Using the command prompt, navigate to the nProbe directory and remove the default nProbe service, named “-n”, by running the following command:
nprobe /r -n
Now, in order to setup your own nProbe service to send NetFlow you will need to gather the following information:
- NetFlow collector IP address and port number
- Your local network subnet
- The interface on your nProbe server that’s receiving network traffic
You can find out how nProbe indexes your current interfaces by using the command prompt from the nProbe directory and running the following command:
nprobe /c -h
This will spit out a lot of information so, you will need to locate the “Available interfaces” section and identify which interface is receiving the mirrored traffic and locate the corresponding interface index number.
Now that you have all the information you need you can install the new nProbe service with your own network settings. The command below is used to create the nProbe service for the network diagram shown above.
nprobe /i nprobe_service --collector 192.168.1.51:2055 --interface 0 --local-networks 192.168.1.0/24 --flow-version 5 --local-traffic-direction --in-iface-idx 1 --out-iface-idx 2 --lifetime-timeout 60 --idle-timeout 15
Be aware that the command above should be entered in on a single line in the command prompt and you will need to modify the first three parameters for your own network settings.
--collector <host:port>--interface <iface>--local-networks <networks>
Now, you need to open up your Windows services, find the service you created, in the example above it is called “nprobe_service” and start it. At this point nProbe has been fully configured to send NetFlow v5 to your NetFlow collector. Open up Scrutinizer and shortly after you should start seeing flows.
If you’re interested in learning more about the different nProbe command line options please see the nProbe user guide.


